内容
隐藏
1安装filebeat
rpm --import https://artifacts.elastic.co/GPG-KEY-elasticsearch
yum -y install filebeat

查看启动配置

 systemctl cat filebeat.service
# /usr/lib/systemd/system/filebeat.service
[Unit]
Description=Filebeat sends log files to Logstash or directly to Elasticsearch.
Documentation=https://www.elastic.co/beats/filebeat
Wants=network-online.target
After=network-online.target

[Service]

Environment="GODEBUG='madvdontneed=1'"
Environment="BEAT_LOG_OPTS="
Environment="BEAT_CONFIG_OPTS=-c /etc/filebeat/filebeat.yml"
Environment="BEAT_PATH_OPTS=--path.home /usr/share/filebeat --path.config /etc/filebeat --path.data /var/lib/filebeat --path.logs /var/log/filebeat"
ExecStart=/usr/share/filebeat/bin/filebeat --environment systemd BEAT_LOG_OPTSBEAT_CONFIG_OPTS $BEAT_PATH_OPTS
Restart=always
2 修改filebeat的配置⽂件
(1)编写测试的配置⽂件
mkdir /etc/filebeat/config
cat > /etc/filebeat/config/01-stdin-to-console.yml <<'EOF'
# 指定输⼊的类型
filebeat.inputs:
# 指定输⼊的类型为"stdin",表示标准输⼊
- type: stdin
# 指定输出的类型(输出到终端)
output.console:
 # 打印漂亮的格式
 pretty: true
EOF
(2)运⾏filebeat实例
filebeat -e -c /etc/filebeat/config/01-stdin-to-console.yml
(3)测试在终端输入内容

[root@filebeat filebeat[]# filebeat -e -c /etc/filebeat/config/01-stdin-to-console.yml

1111111111
{
  "@timestamp": "2023-05-07T13:52:30.005Z",
  "@metadata": {
    "beat": "filebeat",
    "type": "_doc",
    "version": "7.17.10"
  },
  "ecs": {
    "version": "1.12.0"
  },
  "host": {
    "name": "filebeat"
  },
  "agent": {
    "id": "733682a1-ac88-444e-ae43-4191ce8260bf",
    "name": "filebeat",
    "type": "filebeat",
    "version": "7.17.10",
    "hostname": "filebeat",
    "ephemeral_id": "3942a421-2905-4646-b040-4cc3bcadca70"
  },
  "log": {
    "offset": 0,
    "file": {
      "path": ""
    }
  },
  "message": "1111111111",
  "input": {
    "type": "stdin"
  }
}
2023-05-07T21:52:31.025+0800    ERROR   file/states.go:125  State for  should have been dropped, but couldn't as state is not finished.
3 input的log类型
log类型的收集默认是按行收集,filebeat会在收集之后记录文件的偏移量,已保证下次不会从头开始读。
[root@filebeat config[]# cat 02-log-to-console.yml
filebeat.inputs:
- type: log
 paths:
 - /tmp/test.log
output.console:
 pretty: true

记录文件位置
[root@filebeat config[]# ll /var/lib/filebeat/registry/filebeat
总用量 8
-rw-------. 1 root root 632 5月   7 22:03 log.json
-rw-------. 1 root root  15 5月   7 21:52 meta.json

{"k":"filebeat::logs::native::67688859-64768","v":{"type":"log","FileStateOS":{"inode":67688859,"device":64768},"identifier_name":"native","id":"native::67688859-64768","source":"/tmp/test.log","timestamp":[2062526270975,1683469777],"ttl":-1,"prev_id":"","offset":31}}

source:表示读取的文件名
offset: 读取的位置,下次从这个位置开始接着读。
4 filebeat配置多个log输入实例
filebeat.inputs:
- type: log
  paths:
  - /tmp/test.log
  - /tmp/*.txt
  - /tmp/test/*/*.log

output.console:
 pretty: true
5 input的通用字段
5.1 enabled
默认是true,如果设置成false就是不使用。
filebeat.inputs:
 - type: log
   enabled: false #设置false不收集下面日志
   paths:
   - /tmp/test.log
   - /tmp/*.txt
output.console:
 pretty: true
5.2 tag
标记区分不同日志,给当前的输入内容打上标签。
filebeat.inputs:
 - type: log
   enabled: false #设置false不收集下面日志
   paths:
   - /tmp/test.log
   tags: ["项目1","前端日志"]

 - type: log
   enabled: false #设置false不收集下面日志
   paths:
   - /tmp/test2.log
   tags: ["项目二","后端日志","阿里云机房"]

output.console:
 pretty: true
5.3 fields
自定义字段
[root@filebeat config[]# cat 03-log-fields-to-console.yml
filebeat.inputs:
 - type: log
   paths:
   - /tmp/test.log
   - /tmp/*.txt
   fields:
    log_topics: test
    log_host: 127.0.0.1

output.console:
 pretty: true

测试如下

{
  "@timestamp": "2023-05-07T15:04:13.385Z",
  "@metadata": {
    "beat": "filebeat",
    "type": "_doc",
    "version": "7.17.10"
  },
  "ecs": {
    "version": "1.12.0"
  },
  "host": {
    "name": "filebeat"
  },
  "agent": {
    "name": "filebeat",
    "type": "filebeat",
    "version": "7.17.10",
    "hostname": "filebeat",
    "ephemeral_id": "1d14df6b-f685-4351-a8e2-d396a5e16105",
    "id": "c44cb67e-b0fc-4c34-92a9-44edacd78f96"
  },
  "message": "111122222333333",
  "log": {
    "offset": 15,
    "file": {
      "path": "/tmp/test.log"
    }
  },
  "input": {
    "type": "log"
  },
  "fields": {
    "log_topics": "test",
    "log_host": "127.0.0.1"
  }
}
5.4 fields_under_root
[root@filebeat config[]# cat 03-log-fields-to-console.yml
filebeat.inputs:
 - type: log
   paths:
   - /tmp/test.log
   - /tmp/*.txt
   fields:
    log_topics: test
    log_host: 127.0.0.1
    # 将⾃定义字段的key-value放到顶级字段.
    # 默认值为false,会将数据放在⼀个叫"fields"字段的下⾯.
   fields_under_root: false
output.console:
 pretty: true
6 日志过滤
filebeat.inputs:
- type: log
  enabled: true
  paths:
  - /tmp/test/*.log
  # 注意,⿊⽩名单均⽀持通配符,⽣产环节中不建议同时使⽤,
  # 指定⽩名单,包含指定的内容才会采集,且区分⼤⼩写!
  include_lines: ['^ERR', '^WARN','devopstack.cn']
  # 指定⿊名单,排除指定的内容
  exclude_lines: ['^DBG',"linux","dev"]
  # 排除以.gz结尾的文件
  exclude_files: ['\.gz$']
output.console:
 pretty: true
7 将数据写入至es
cat 04-log-fields-to-es.yml
filebeat.inputs:
 - type: log
   paths:
   - /tmp/test.log
   - /tmp/*.txt
   fields:
    log_topics: test
    log_host: 127.0.0.1

output.elasticsearch:
 hosts: ["http://192.168.10.31:9200","http://192.168.10.32:9200","http://192.168.10.33:9200"]
 username: "elastic"
 password: "aka2velfFJGz178SExyi"

启动
[root@filebeat config[]# filebeat -e -c /etc/filebeat/config/04-log-fields-to-es.yml

通过查看 kibana,可以看到索引已经在es中创建了,数据也过去了
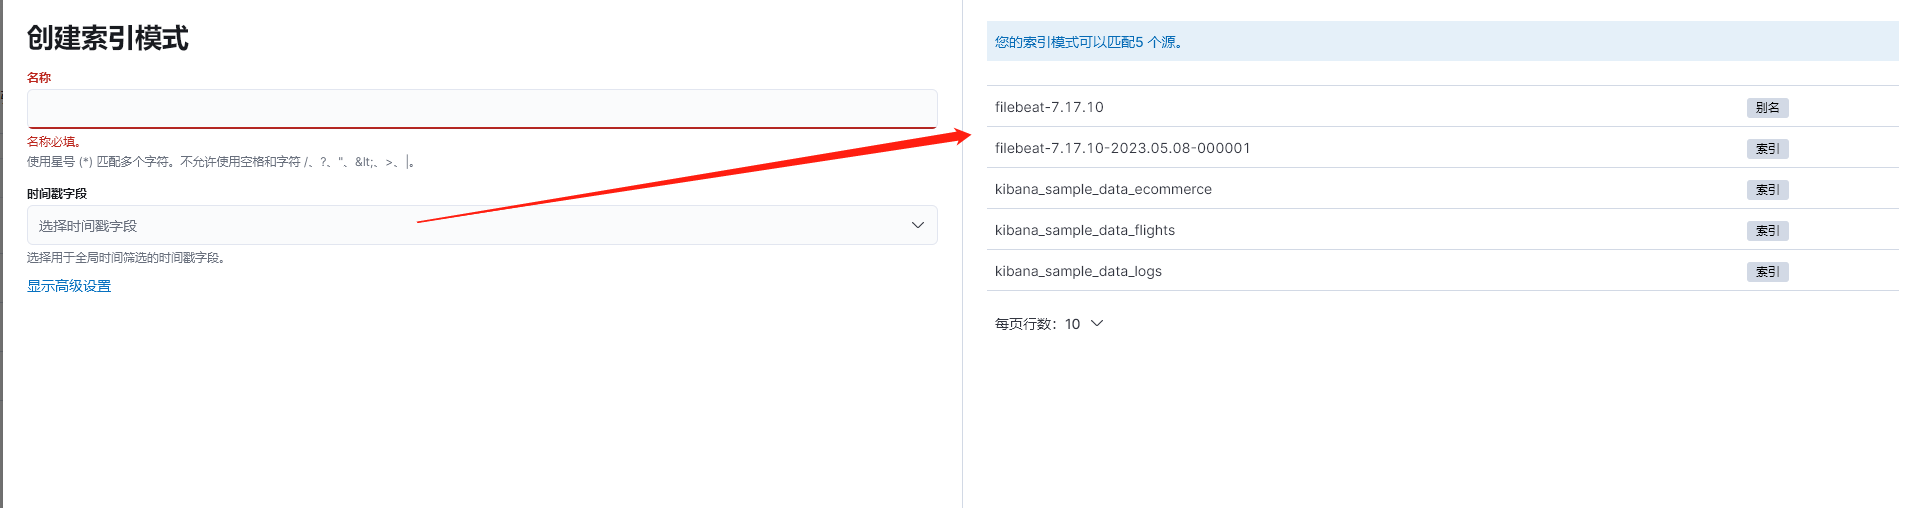
8 自定义索引名称
[root@filebeat 22[]# cat /etc/filebeat/config/05-log-fields-to-es.yml
filebeat.inputs:
- type: log
paths:
- /tmp/test.log
- /tmp/*.txt
tags: ["test1"]
fields:
name: "app1"
log_topics: test
log_host: 127.0.0.1
- type: log
enabled: true
paths:
- /tmp/test/*/*.log
tags: ["test2","devopstack"]
fields:
name: "app2"
hobby: "test111"
fields_under_root: true
output.elasticsearch:
hosts: ["http://192.168.10.31:9200","http://192.168.10.32:9200","http://192.168.10.33:9200"]
username: "elastic"
password: "aka2velfFJGz178SExyi"
index: "devopstack-linux-elk-%{+yyyy.MM.dd}"
# 禁⽤索引⽣命周期管理
setup.ilm.enabled: false
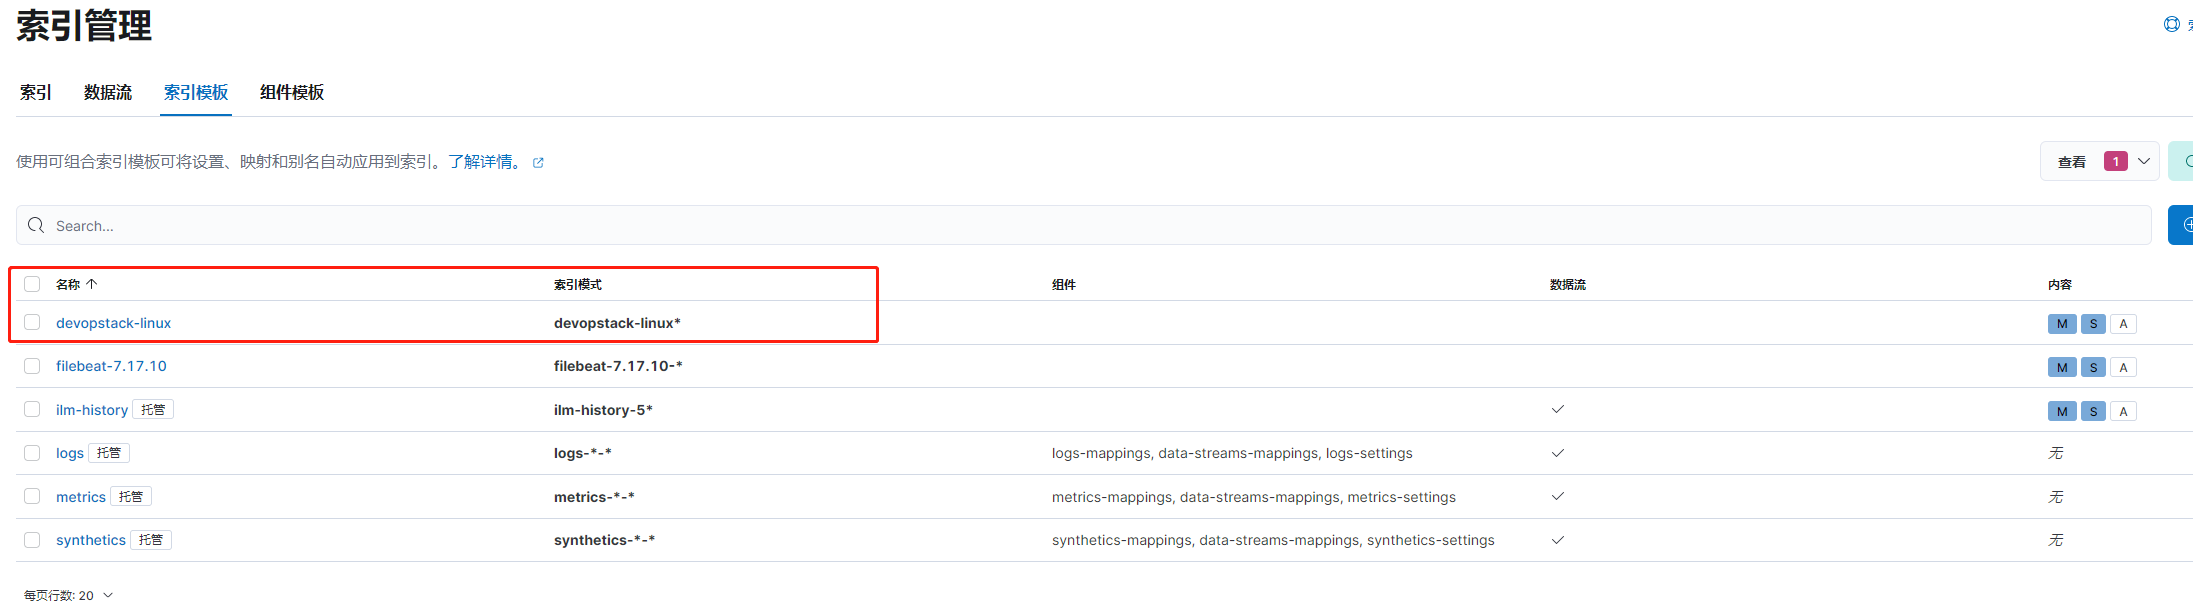
# # 设置索引模板的名称
setup.template.name: "devopstack-linux"
# # 设置索引模板的匹配模式
setup.template.pattern: "devopstack-linux*"
如图所示,已创建我们指定的索引模板
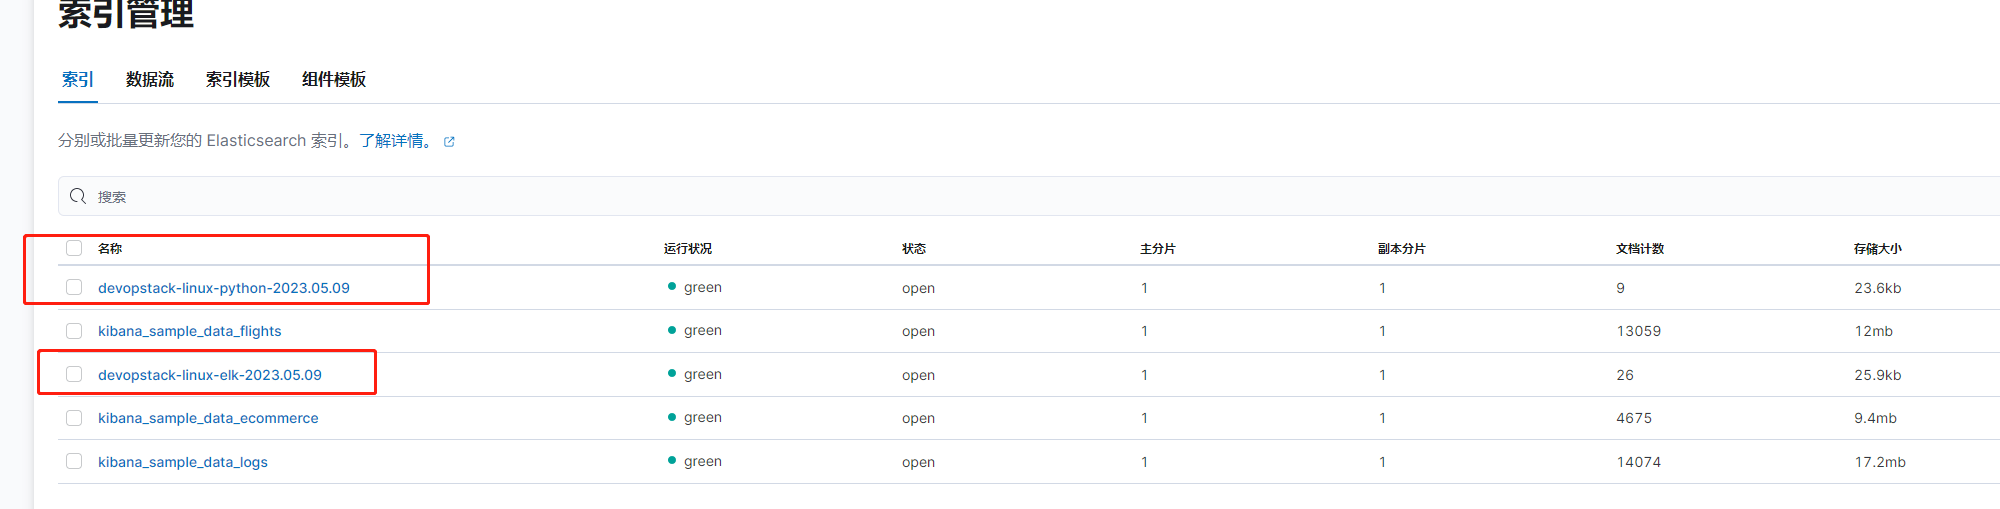
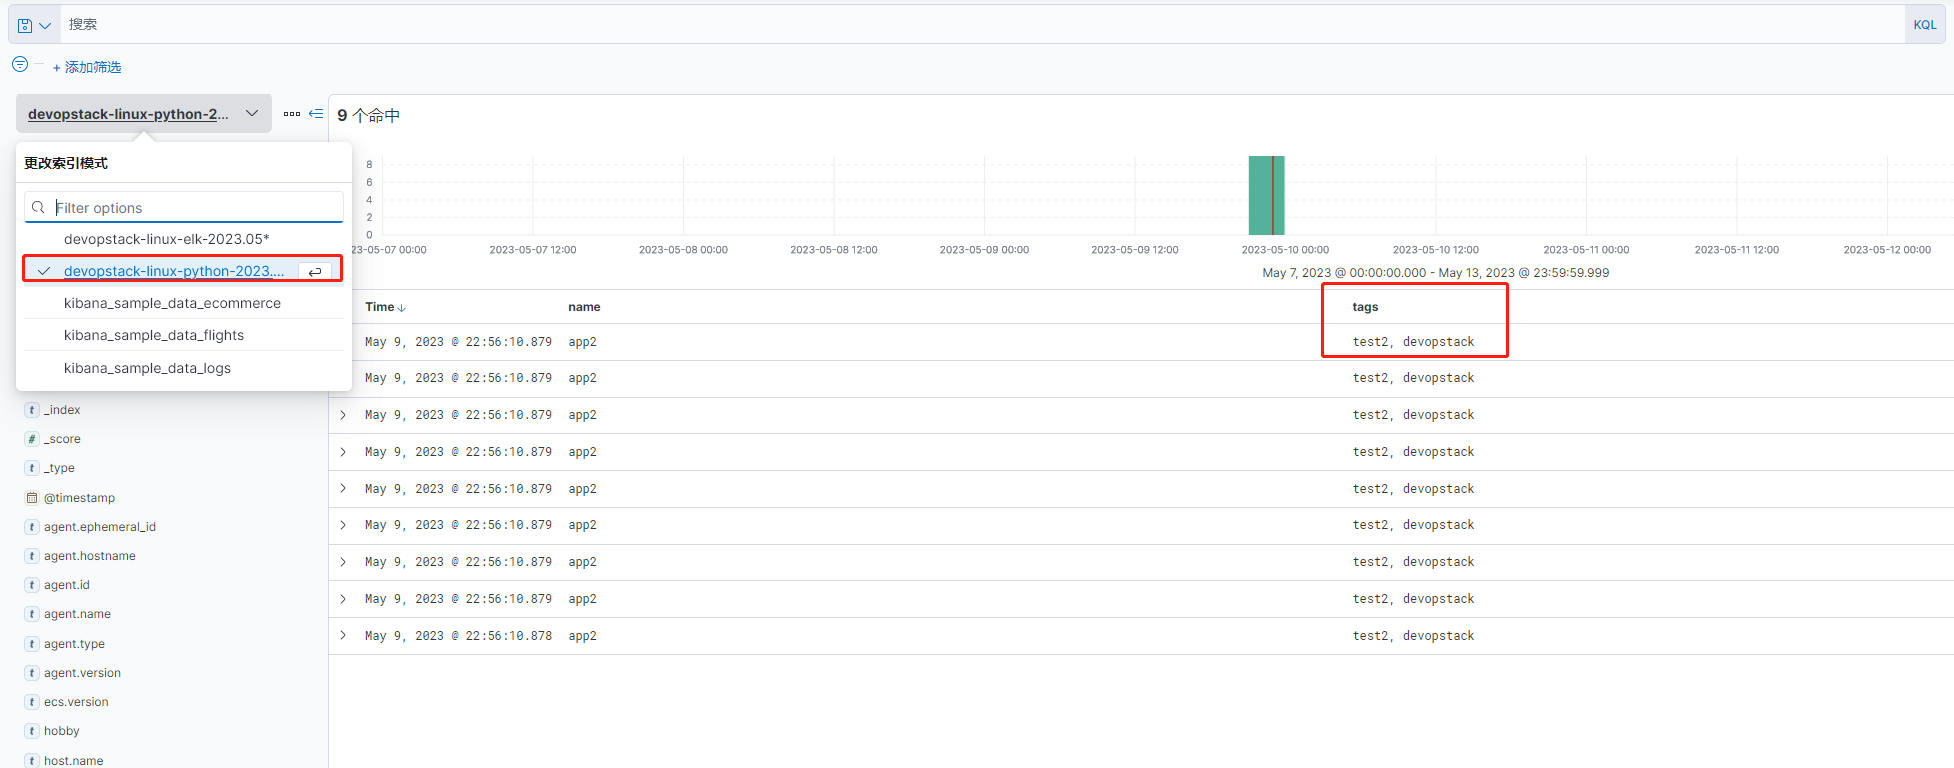
9 根据tag字段写入不同的索引
[root@filebeat config[]# cat 06-log-when-to-es.yml
filebeat.inputs:
 - type: log
   paths:
   - /tmp/test.log
   - /tmp/*.txt
   tags: ["test1"]
   fields:
    name: "app1"
    log_topics: test
    log_host: 127.0.0.1

 - type: log
   enabled: true
   paths:
   - /tmp/test/*/*.log
   tags: ["test2","devopstack"]
   fields:
    name: "app2"
    hobby: "test111"
   fields_under_root: true

output.elasticsearch:
 hosts: ["http://192.168.10.31:9200","http://192.168.10.32:9200","http://192.168.10.33:9200"]
 username: "elastic"
 password: "aka2velfFJGz178SExyi"
 indices:
   - index: "devopstack-linux-elk-%{+yyyy.MM.dd}"
     when.contains:
       tags: "test1"
   - index: "devopstack-linux-python-%{+yyyy.MM.dd}"
     when.contains:
       tags: "test2"
 # 禁⽤索引⽣命周期管理
setup.ilm.enabled: false
 # # 设置索引模板的名称
setup.template.name: "devopstack-linux"
 # # 设置索引模板的匹配模式
setup.template.pattern: "devopstack-linux*"

启动之后,查看kibana
10 ES自定义分片和副本
output.elasticsearch:
 hosts: ["http://192.168.10.31:9200","http://192.168.10.32:9200","http://192.168.10.33:9200"]
 username: "elastic"
 password: "aka2velfFJGz178SExyi"
 indices:
   - index: "devopstack-linux-elk-%{+yyyy.MM.dd}"
     when.contains:
       tags: "test1"
   - index: "devopstack-linux-python-%{+yyyy.MM.dd}"
     when.contains:
       tags: "test2"
 # 禁⽤索引⽣命周期管理
setup.ilm.enabled: false
 # # 设置索引模板的名称
setup.template.name: "devopstack-linux"
 # # 设置索引模板的匹配模式
setup.template.pattern: "devopstack-linux*"
# 覆盖已有的索引模板
setup.template.overwrite: false
# 配置索引模板
setup.template.settings:
# 设置分⽚数量
  index.number_of_shards: 3
# 设置副本数量,要求⼩于集群的数量
  index.number_of_replicas: 2

11 日志聚合到本地
filebeat.inputs:
- type: tcp
 host: "0.0.0.0:9000"
output.file:
 path: "/tmp/filebeat"
 filename: linux-test
# 指定⽂件的滚动⼤⼩,默认值为20MB
 rotate_every_kb: 102400
# 指定保存的⽂件个数,默认是7个,有效值为2-1024个
 number_of_files: 300
# 指定⽂件的权限,默认权限是0600
 permissions: 0600
12 基于log类型收集nginx原⽣⽇志
收集nginx日志配置如下
[root@filebeat config[]# cat 07-nginx-when-to-es.yml
filebeat.inputs:
 - type: log
   paths:
    - /var/log/nginx/access.log*
   tags: ["nginx"]

output.elasticsearch:
 hosts: ["http://192.168.10.31:9200","http://192.168.10.32:9200","http://192.168.10.33:9200"]
 username: "elastic"
 password: "aka2velfFJGz178SExyi"
 indices:
   - index: "devopstack-linux-nginx-%{+yyyy.MM.dd}"
 # 禁⽤索引⽣命周期管理
setup.ilm.enabled: false
 # # 设置索引模板的名称
setup.template.name: "devopstack-linux"
 # # 设置索引模板的匹配模式
setup.template.pattern: "devopstack-linux*"
# 覆盖已有的索引模板
setup.template.overwrite: false
# 配置索引模板
setup.template.settings:
# 设置分⽚数量
 index.number_of_shards: 3
# 设置副本数量,要求⼩于集群的数量
 index.number_of_replicas: 2
13 基于log类型收集nginx的json⽇志
修改nginx配置,支持json格式,vim /etc/nginx/nginx.conf
http {
log_format oldboyedu_nginx_json '{"@timestamp":"time_iso8601",'
'"host":"server_addr",'
'"clientip":"remote_addr",'
'"SendBytes":body_bytes_sent,'
'"responsetime":request_time,'
'"upstreamtime":"upstream_response_time",'
'"upstreamhost":"upstream_addr",'
'"http_host":"host",'
'"uri":"uri",'
'"domain":"host",'
'"xff":"http_x_forwarded_for",'
'"referer":"http_referer",'
'"tcp_xff":"proxy_protocol_addr",'
'"http_user_agent":"http_user_agent",'
'"status":"$status"}';
access_log /var/log/nginx/access.log oldboyedu_nginx_json;
修改filebeat配置
filebeat.inputs:
- type: log
paths:
- /var/log/nginx/access.log*
tags: ["nginx"]
# 以JSON格式解析message字段的内容
json.keys_under_root: true
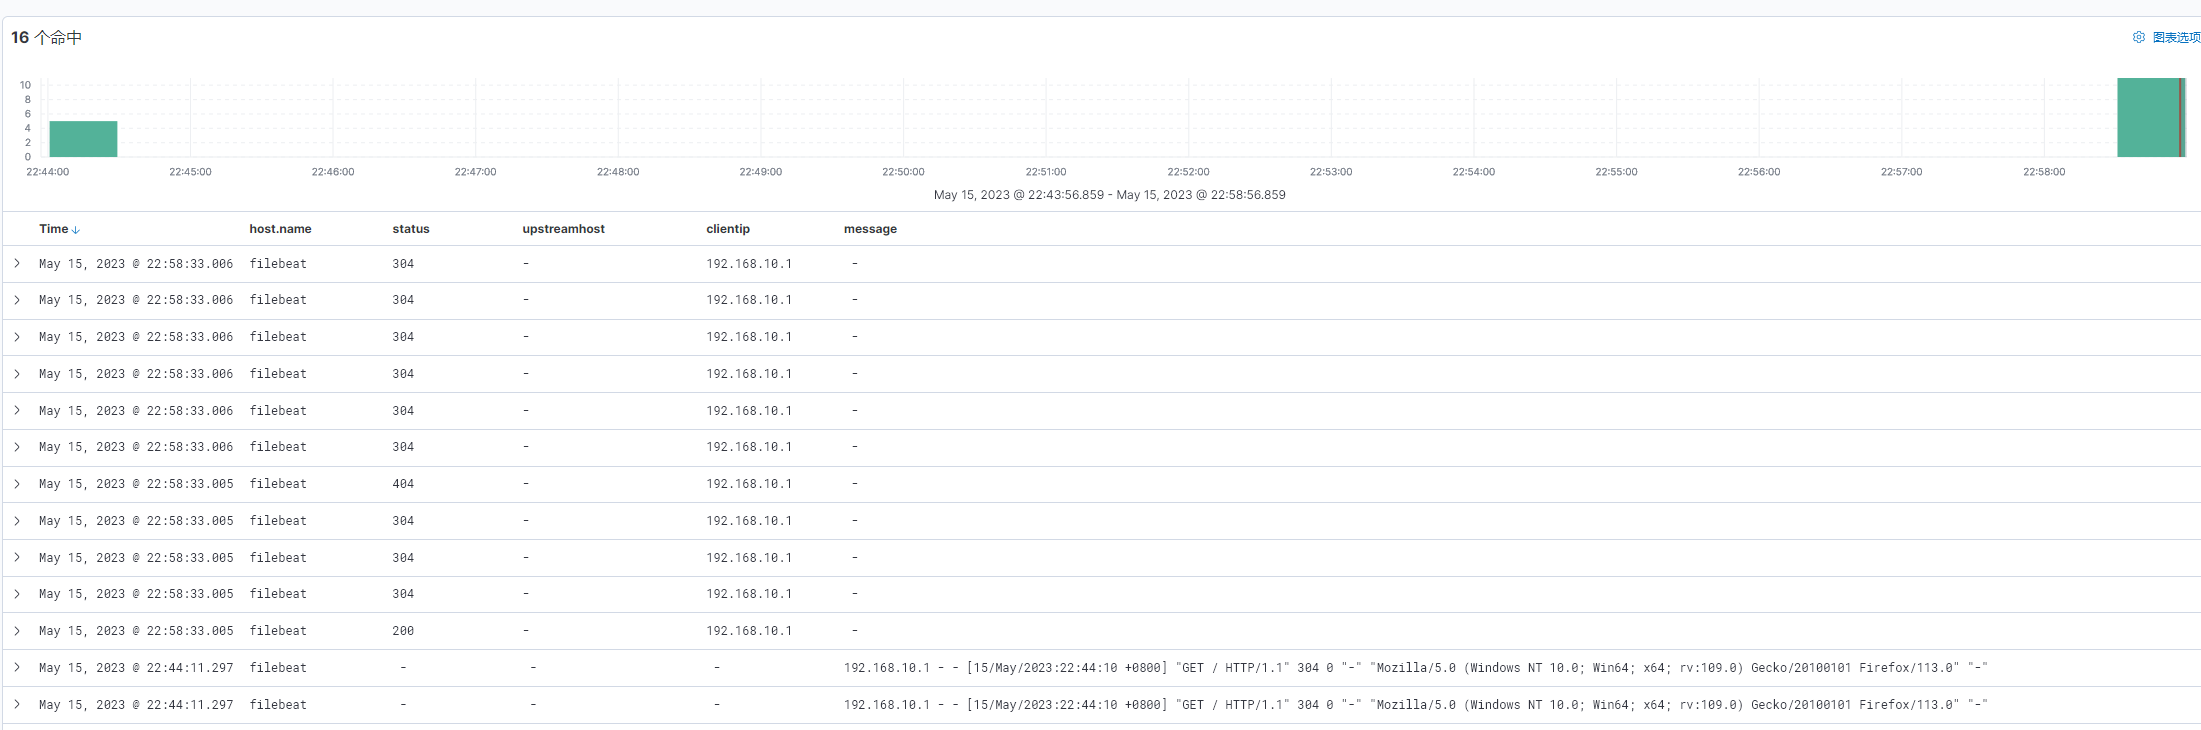
然后就能收集json格式得nginx日志了。就把nginx message字段拆分成多个字段了,如下图
14 基于modules收集nginx日志
查看模块
filebeat modules list
启动模块
filebeat modules enable nginx tomcat

禁⽤模块
filebeat modules disable nginx tomcat

filebeat配置⽂件(需要启⽤nginx模块)
filebeat.config.modules:
# 指定模块的配置⽂件路径,如果是yum⽅式安装,在7.17.3版本中不能使⽤如下的默认值。
# path: ${path.config}/modules.d/*.yml
# 经过实际测试,推荐⼤家使⽤如下的配置,此处写绝对路径即可!⽽对于⼆进制部署⽆需做此
操作.
 path: /etc/filebeat/modules.d/*.yml
# 开启热加载功能
 reload.enabled: true

/etc/filebeat/modules.d/nginx.yml⽂件内容
- module: nginx
 access:
 enabled: true
 var.paths: ["/var/log/nginx/access.log*"]
 error:
 enabled: false
 var.paths: ["/var/log/nginx/error.log"]
 ingress_controller:
 enabled: false
15 基于log类型收集tomcat的json⽇志
(1)⾃定义tomcat的⽇志格式
cp /oldboyedu/softwares/apache-tomcat10.0.20/conf/{server.xml,server.xml-`date +%F`}
...(切换到⾏尾修改,⼤概是在133-149之间)
<Host name="tomcat.oldboyedu.com" appBase="webapps"
unpackWARs="true" autoDeploy="true">
<Valve className="org.apache.catalina.valves.AccessLogValve"
directory="logs"
prefix="tomcat.oldboyedu.com_access_log" suffix=".txt"
pattern="
{"clientip":"%h","ClientUser":"%l&quo
t;,"authenticated":"%u","AccessTime":"
;%t","request":"%r","status":"%s
","SendBytes":"%b","Query?
string":"%q","partner":"%
{Referer}i","http_user_agent":"%{UserAgent}i"}"/>
</Host>
(2)修改filebeat的配置⽂件
filebeat.inputs:
- type: log
enabled: true
paths:
- /oldboyedu/softwares/apache-tomcat-10.0.20/logs/*.txt
# 解析message字段的json格式,并放在顶级字段中
json.keys_under_root: true
output.elasticsearch:
enabled: true
hosts: ["http://192.168.10.31:9200","http://192.168.10.32:9200","http://192.168.10.33:9200"]
username: "elastic"
password: "aka2velfFJGz178SExyi"
index: "oldboyedu-linux-tomcat-access-%{+yyyy.MM.dd}"
# 禁⽤索引⽣命周期管理
setup.ilm.enabled: false
# 设置索引模板的名称
setup.template.name: "oldboyedu-linux"
# 设置索引模板的匹配模式
setup.template.pattern: "oldboyedu-linux*"
# 覆盖已有的索引模板,如果为true,则会直接覆盖现有的索引模板,如果为false则不覆盖!
setup.template.overwrite: true
# 配置索引模板
setup.template.settings:
# 设置分⽚数量
index.number_of_shards: 3
# 设置副本数量,要求⼩于集群的数量
index.number_of_replicas: 0
16 多⾏匹配-收集tomcat的错误⽇志
filebeat.inputs:
- type: log
 enabled: true
 paths:
 - /oldboyedu/softwares/apache-tomcat-10.0.20/logs/*.out
# 指定多⾏匹配的类型,可选值为"pattern","count"
 multiline.type: pattern
# 指定匹配模式
 multiline.pattern: '^\d{2}'
# 下⾯2个参数参考官⽅架构图即可,如上图所示。
 multiline.negate: true
 multiline.match: after
output.elasticsearch:
 enabled: true
  hosts: ["http://192.168.10.31:9200","http://192.168.10.32:9200","http://192.168.10.33:9200"]
 username: "elastic"
 password: "aka2velfFJGz178SExyi"
 index: "oldboyedu-linux-tomcat-error-%{+yyyy.MM.dd}"
# 禁⽤索引⽣命周期管理
setup.ilm.enabled: false
# 设置索引模板的名称
setup.template.name: "oldboyedu-linux"
# 设置索引模板的匹配模式
setup.template.pattern: "oldboyedu-linux*"
# 覆盖已有的索引模板,如果为true,则会直接覆盖现有的索引模板,如果为false则不覆盖!
setup.template.overwrite: true
# 配置索引模板
setup.template.settings:
# 设置分⽚数量
 index.number_of_shards: 3
# 设置副本数量,要求⼩于集群的数量
 index.number_of_replicas: 0
17 多⾏匹配M收集elasticsearch的错误⽇志
filebeat.inputs:
- type: log
 enabled: true
 paths:
 - /var/log/elasticsearch/oldboyedu-elk-2022.log*
# 指定多⾏匹配的类型,可选值为"pattern","count"
 multiline.type: pattern
# 指定匹配模式
 multiline.pattern: '^\['
# 下⾯2个参数参考官⽅架构图即可
 multiline.negate: true
 multiline.match: after
output.elasticsearch:
 enabled: true
 hosts: ["http://192.168.10.31:9200","http://192.168.10.32:9200","http://192.168.10.33:9200"]
 username: "elastic"
 password: "aka2velfFJGz178SExyi"
 index: "oldboyedu-linux-es-error-%{+yyyy.MM.dd}"
# 禁⽤索引⽣命周期管理
setup.ilm.enabled: false
# 设置索引模板的名称
setup.template.name: "oldboyedu-linux"
# 设置索引模板的匹配模式
setup.template.pattern: "oldboyedu-linux*"
# 覆盖已有的索引模板,如果为true,则会直接覆盖现有的索引模板,如果为false则不覆盖!
setup.template.overwrite: true
# 配置索引模板
setup.template.settings:
# 设置分⽚数量
 index.number_of_shards: 3
# 设置副本数量,要求⼩于集群的数量
 index.number_of_replicas: 0
18 nginx错误⽇志过滤
 filebeat.inputs:
- type: log
 enabled: true
 paths:
 - /var/log/nginx/access.log*
 tags: ["access"]
# 解析message字段的json格式,并放在顶级字段中
 json.keys_under_root: true
- type: log
 enabled: true
 paths:
 - /var/log/nginx/error.log*
 tags: ["error"]
 include_lines: ['\[error\]']
output.elasticsearch:
 enabled: true
hosts: ["http://192.168.10.31:9200","http://192.168.10.32:9200","http://192.168.10.33:9200"]
 username: "elastic"
 password: "aka2velfFJGz178SExyi"
 indices:
 - index: "oldboyedu-linux-web-nginx-access-%{+yyyy.MM.dd}"
# 匹配指定字段包含的内容
 when.contains:
 tags: "access"
 - index: "oldboyedu-linux-web-nginx-error-%{+yyyy.MM.dd}"
 when.contains:
 tags: "error"
# 禁⽤索引⽣命周期管理
setup.ilm.enabled: false
# 设置索引模板的名称
setup.template.name: "oldboyedu-linux"
# 设置索引模板的匹配模式
setup.template.pattern: "oldboyedu-linux*"
# 覆盖已有的索引模板
setup.template.overwrite: true
# 配置索引模板
setup.template.settings:
# 设置分⽚数量
 index.number_of_shards: 3
# 设置副本数量,要求⼩于集群的数量
 index.number_of_replicas: 0
19 log类型切换filestream类型注意事项
19.1 filestream类型json解析配置
filebeat.inputs:
- type: filestream
 enabled: true
 paths:
 - /var/log/nginx/access.log*
 tags: ["access"]
 # 对于filestream类型⽽⾔,不能直接配置json解析,⽽是需要借助解析器实现
 # json.keys_under_root: true
 # 综上所述,我们就需要使⽤以下的写法实现.
 parsers:
 # 使 Filebeat能够解码结构化为JSON消息的⽇志。
 # Filebeat逐⾏处理⽇志,因此JSON解码仅在每条消息有⼀个JSON对象时才有效。
 - ndjson:
 # 对message字段进⾏JSON格式解析,并将key放在顶级字段。
 keys_under_root: true
output.elasticsearch:
 enabled: true
  hosts: ["http://192.168.10.31:9200","http://192.168.10.32:9200","http://192.168.10.33:9200"]
 username: "elastic"
 password: "aka2velfFJGz178SExyi"
 index: "oldboyedu-linux-nginx-%{+yyyy.MM.dd}"
setup.ilm.enabled: false
setup.template.name: "oldboyedu-linux"
setup.template.pattern: "oldboyedu-linux*"
setup.template.overwrite: true
setup.template.settings:
 index.number_of_shards: 3
 index.number_of_replicas: 0
19.2 filestream类型多⾏匹配
filebeat.inputs:
- type: filestream
  enabled: true
  paths:
  - /oldboyedu/softwares/apache-tomcat-10.0.20/logs/*.txt
 tags: ["access"]
 parsers:
 - ndjson:
 keys_under_root: true
- type: filestream
 enabled: true
 paths:
 - /oldboyedu/softwares/apache-tomcat-10.0.20/logs/*.out
 tags: ["error"]
 parsers:
 - multiline:
 type: pattern
 pattern: '^\d{2}'
 negate: true
 match: after
output.elasticsearch:
 enabled: true
 hosts: ["http://192.168.10.31:9200","http://192.168.10.32:9200","http://192.168.10.33:9200"]
 username: "elastic"
 password: "aka2velfFJGz178SExyi"
 indices:
 - index: "oldboyedu-linux-web-tomcat-access-%{+yyyy.MM.dd}"
 when.contains:
 tags: "access"
 - index: "oldboyedu-linux-web-tomcat-error-%{+yyyy.MM.dd}"
 when.contains:
 tags: "error"
setup.ilm.enabled: false
setup.template.name: "oldboyedu-linux"
setup.template.pattern: "oldboyedu-linux*"
setup.template.overwrite: true
setup.template.settings:
 index.number_of_shards: 3
 index.number_of_replicas: 0
20 将filebeat数据写⼊到redis环境
filebeat.inputs:
- type: tcp
 host: "0.0.0.0:9000"
output.redis:
# 写⼊redis的主机地址
 hosts: ["10.0.0.101:6379"]
# 指定redis的认证⼝令
 password: "oldboyedu"
# 指定连接数据库的编号
 db: 5
# 指定的key值
 key: "oldboyedu-linux80-filebeat"
# 规定超时时间.
 timeout: 3
- 我的微信
- 这是我的微信扫一扫
-

- 我的微信公众号
- 我的微信公众号扫一扫
-