1 环境准备
1.1 主机ip规划
主机名IP地址角色系统
web-node1  eth0:10.0.0.65 web-node1节点   CentOS7.2
web-node2  eth0:10.0.0.66  web-node2节点   CentOS7.2
1.2 环境信息
web-node1:
[root@web-node1 src]# uname -r
3.10.0-229.el7.x86_64
[root@web-node1 src]# uname -m
x86_64
[root@web-node1 src]# cat /etc/hostname
web-node1
[root@web-node1 src]# cat /etc/hosts
127.0.0.1   localhost localhost.localdomain localhost4 localhost4.localdomain4
::1         localhost localhost.localdomain localhost6 localhost6.localdomain6
10.0.0.65    web-node1
10.0.0.66    web-node2
web-node2:
[root@web-node2 src]# uname -r
3.10.0-229.el7.x86_64
[root@web-node2 src]# uname -m
x86_64
[root@web-node2 src]# cat /etc/hostname
web-node2
[root@web-node2 src]# cat /etc/hosts
127.0.0.1   localhost localhost.localdomain localhost4 localhost4.localdomain4
::1         localhost localhost.localdomain localhost6 localhost6.localdomain6
10.0.0.65    web-node1
10.0.0.66    web-node2
2 节点部署apache作为RS
node1操作
web-node1:

[root@web-node1 haproxy]# yum install -y httpd
sed -i 's/Listen 80/Listen 8080/g' /etc/httpd/conf/httpd.conf
systemctl start httpd
 echo "web-node1" > /var/www/html/index.html
[root@web-node1 haproxy]#  curl  http://10.0.0.65:8080/
web-node1
node2
web-node2:

[root@web-node2 haproxy]# yum install -y httpd
[root@web-node2 u02]# sed -i 's/Listen 80/Listen 8080/g' /etc/httpd/conf/httpd.conf
[root@web-node2 u02]# service  httpd start
[root@web-node2 u02]#  echo "web-node2" > /var/www/html/index.html
[root@web-node2 u02]# curl  http://10.0.0.66:8080/
web-node2

因为两台服务器,没有多余ip了,所以临时创建一个ip
ifconfig eth0:0  10.0.0.67 netmask 255.255.255.128 broadcast 10.0.0.127
3 安装haproxy
目前haproxy最高版本是1.7.8,本次实验使用1.7.5
下载地址:http://www.haproxy.org/download/1.7/
web-node1:
[root@web-node1 haproxy-1.7.5]# cd /usr/local/src
[root@web-node1 ]# wget http://www.haproxy.org/download/1.7/src/haproxy-1.7.5.tar.gz
[root@web-node1 haproxy-1.7.5]#  tar -zxf  haproxy-1.7.5.tar.gz
[root@web-node1 haproxy-1.7.5]#  cd haproxy-1.7.5
[root@web-node1 haproxy-1.7.5]#   make TARGET=linux2628 PREFIX=/usr/local/haproxy-1.7.5
[root@web-node1 haproxy-1.7.5]# make install PREFIX=/usr/local/haproxy-1.7.5
[root@web-node1 haproxy-1.7.5]# cp /usr/local/sbin/haproxy /usr/sbin/
[root@web-node1 local]# ln -s /usr/local/haproxy-1.7.5 /usr/local/haproxy
[root@web-node1 haproxy-1.7.5]# haproxy -v
HA-Proxy version 1.7.5 2017/04/03
Copyright 2000-2017 Willy Tarreau <willy@haproxy.org>
#参数说明
TARGET=linux26 #内核版本,使用uname -r查看内核,如:2.6.18-371.el5,此时该参数就为linux26;kernel 大于2.6.28的用:TARGET=linux2628
ARCH=x86_64 #系统位数
PREFIX=/usr/local/haprpxy #/usr/local/haprpxy为haprpxy安装路径
编辑Haproxy启动脚本:
[root@web-node1 haproxy-1.7.5]# cp /usr/local/src/haproxy-1.7.5/examples/haproxy.init /etc/init.d/haproxy
[root@web-node1 haproxy-1.7.5]# chmod +x /etc/init.d/haproxy
创建haproxy相关目录
[root@web-node1 haproxy-1.7.5]# useradd -r haproxy  ##创建系统用户
[root@web-node1 haproxy-1.7.5]# mkdir /etc/haproxy
[root@web-node1 haproxy-1.7.5]# mkdir /var/lib/haproxy
[root@web-node1 haproxy-1.7.5]# mkdir /var/run/haproxy
修改配置文件:
[root@web-node1 haproxy]# ulimit -n
65535 ##
[root@web-node1 haproxy]# cat haproxy.cfg
global
   log 127.0.0.1 local3 debug
   chroot /var/lib/haproxy
   user haproxy
   group haproxy
   nbproc 1
   maxconn 65535
   daemon
defaults
   log global
   mode http
   option httplog
   option dontlognull
   option abortonclose
   timeout connect 5000
   timeout client 50000
   timeout server 50000
  #balance  roundrobin
listen status
   bind 0.0.0.0:1080
   mode http
   option httplog
   maxconn 10
   stats refresh 30s
   stats uri  /haproxy?stats
   stats realm XingCloud\ Haproxy
   stats auth admin:admin
   stats auth Frank:Frank
   stats hide-version
#errorfile 403 /home/haproxy/haproxy/errorfiles/403.http
#errorfile 500 /home/haproxy/haproxy/errorfiles/500.http
#errorfile 502 /home/haproxy/haproxy/errorfiles/502.http
#errorfile 503 /home/haproxy/haproxy/errorfiles/503.http
#errorfile 504 /home/haproxy/haproxy/errorfiles/504.http

frontend haproxy_cool360_org_frontend
   mode http
   bind 10.0.0.67:80
   stats uri /haproxy?stats
   acl proxy_cool360_org_bak hdr_end(host) -i blog.cool360.org
   default_backend  proxy_cool360_org_backend
   use_backend webserver if proxy_cool360_org_bak
backend proxy_cool360_org_backend
#source cookie SERVERID
   option forwardfor header X-REAL-IP
   option httpchk GET /index.html
   balance roundrobin  #使用rr负载均衡方式,balance source 保存session值,支持static-rr,leastconn,first,uri等参数
   server web-node1 10.0.0.65:8080 check inter 2000 rise 3 fall 3 weight 2
   server web-node2 10.0.0.66:8080 check inter 2000 rise 3 fall 3 weight 1
backend webserver
#source cookie SERVERID
   option forwardfor header X-REAL-IP
   #option httpchk GET /index.html
      #option httpchk HEAD /index.html HTTP/1.0  ###健康检查, 检测文件,如果分发到到index.html访问不到就不再分发给它
   balance roundrobin  #使用rr负载均衡方式,balance source 保存session值,支持static-rr,leastconn,first,uri等参数
   server web-node1 10.0.0.65:8080 check port 8080 inter 2000 rise 3 fall 3 weight 2
   server web-node2 10.0.0.66:8080 check  port 8080 inter 2000 rise 3 fall 3 weight 1
  # check 默认检查ip后面的端口
listen  tcp
   bind *:58422
   mode  tcp
   option tcplog
   balance source
   server s1  10.0.0.65:22 weight 1
   server s1  10.0.0.66:22 weight 1

重启haproxy:
[root@web-node1 haproxy]# /usr/sbin/haproxy  -f /etc/haproxy/haproxy.cfg -c ##检查语法
[root@web-node1 haproxy]# /etc/init.d/haproxy restart
测试下效果:
for  n in `echo {1..100}` ; do curl http://10.0.0.67; sleep 2; done
[root@web-node1 haproxy]# for  n in `echo {1..100}` ; do curl http://10.0.0.65; sleep 2; done
web-node1
web-node1
web-node2
web-node1
web-node1
web-node2
web-node1

效果达到。
4 配置Haproxy日志
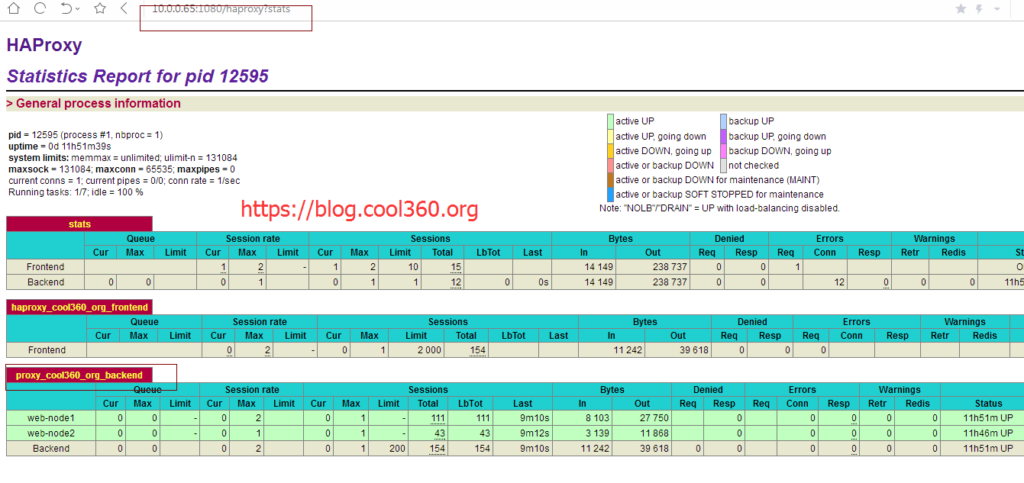
5 Haproxy状态管理页面